In order to lower the development barrier, shorten the development cycle, and reduce the development investment, Gizwits has rolled out Gizwits MCU Code Auto-Generator, which generates the device-side code for the corresponding product based on Data Points defined for the product.
The automatically generated MCU code implements the packet encapsulation and parsing of the Gizwits communication protocol, the conversion logic of sensor data and communication data. All of these functions are integrated into a simple API set. When the device receives data from the cloud or the App, the program converts the data into corresponding events and notifies the application layer. You only needs to add the sensor control functions to the corresponding event handlers to complete the product development.
With the automatically generated code, you don’t have to deal with protocol-related issues, and focus on the core functional development of the product, which allows you to save time and effort.
2. Supported platforms
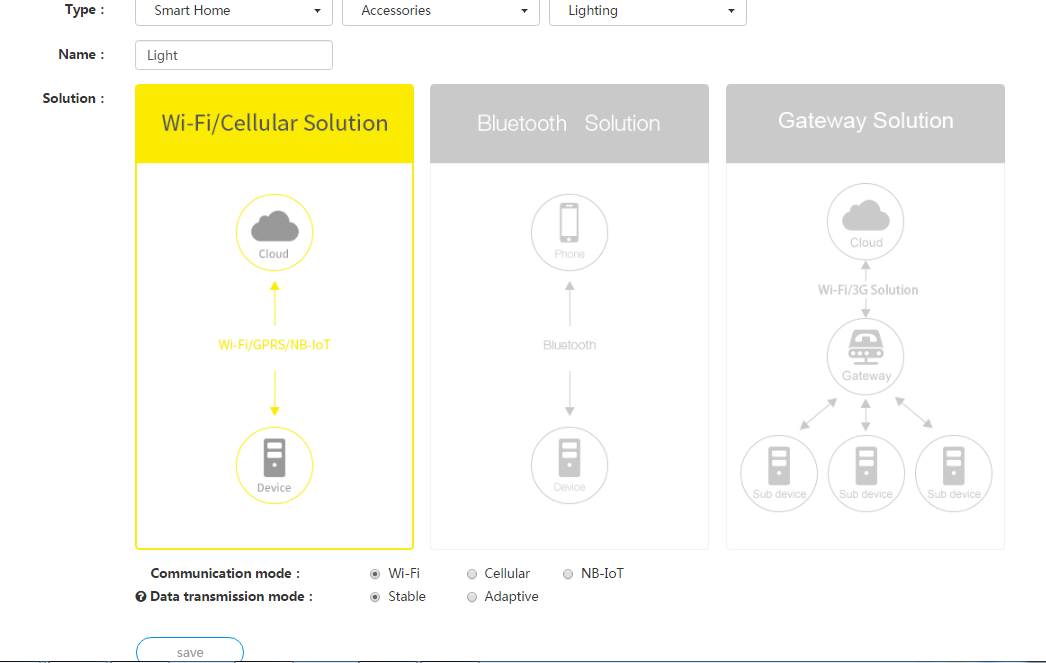
The hardware schemes supported by Gizwits MCU Code Auto-Generator are: standalone MCU scheme and SoC scheme. The hardware platforms supported by the standalone MCU scheme are: stm32f103c8x and common platform (i.e. other platforms); the hardware platform supported by the SoC scheme is: ESP8266.
The difference between the standalone MCU scheme and the SoC scheme is as follow:
Scheme
Description
Standalone MCU scheme
The standalone MCU scheme adopts the form of MCU plus Wi-Fi module. The Wi-Fi module is responsible for interacting with the cloud, and communicates with the MCU through the serial port. While the MCU parses the Gizwits serial communication protocol and implements peripheral control logic and data acquisition from sensors.
SoC scheme
The SoC scheme only uses a Wi-Fi module. That means the internal resources of the Wi-Fi module are used to complete the sensor operation and product control logic, and simultaneously perform communication with the cloud. Compared with the standalone MCU scheme, one MCU is saved. The disadvantage is that the Wi-Fi module has less I/O resources, and the development is more complicated.
In addition to supporting the STM32 platform, the standalone MCU scheme can also help us to port the generated Common Platform Edition of the MCU SDK to any platform that meets the requirements, so as to implement the various functions provided by Gizwits (for details, see Guide to porting Common Platform Edition of MCU SDK).
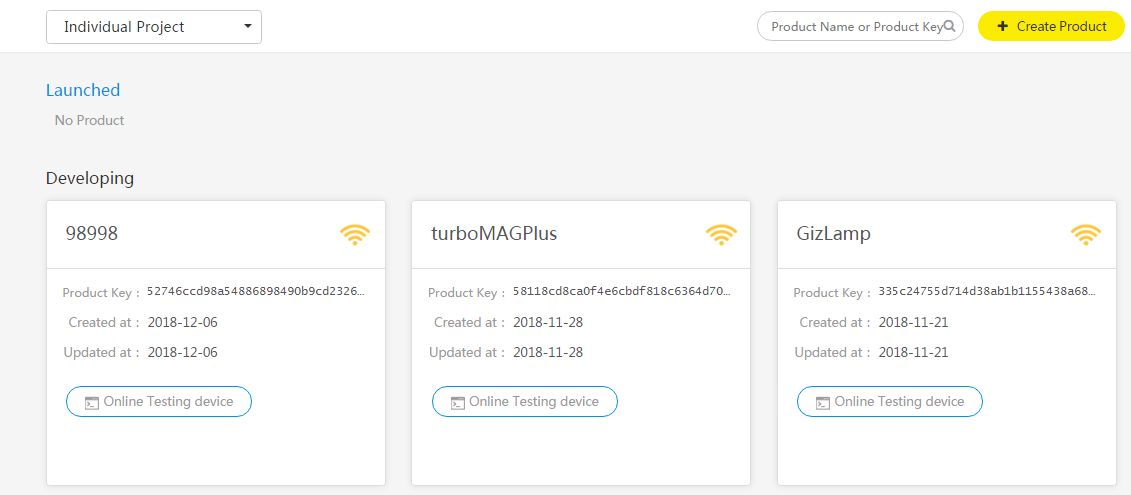
Click “Create a new product” button at the top right corner of the Developer Center to create a new product. Type the corresponding product information and click “Save”.
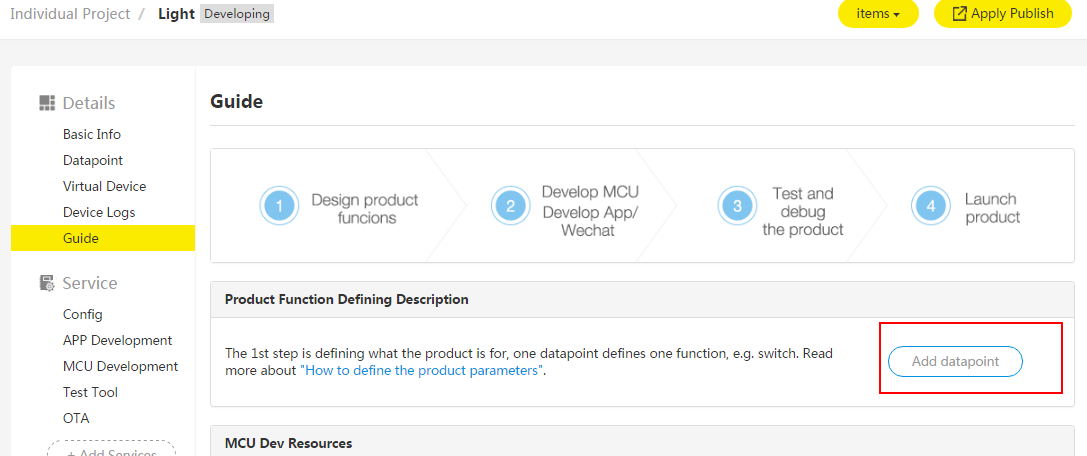
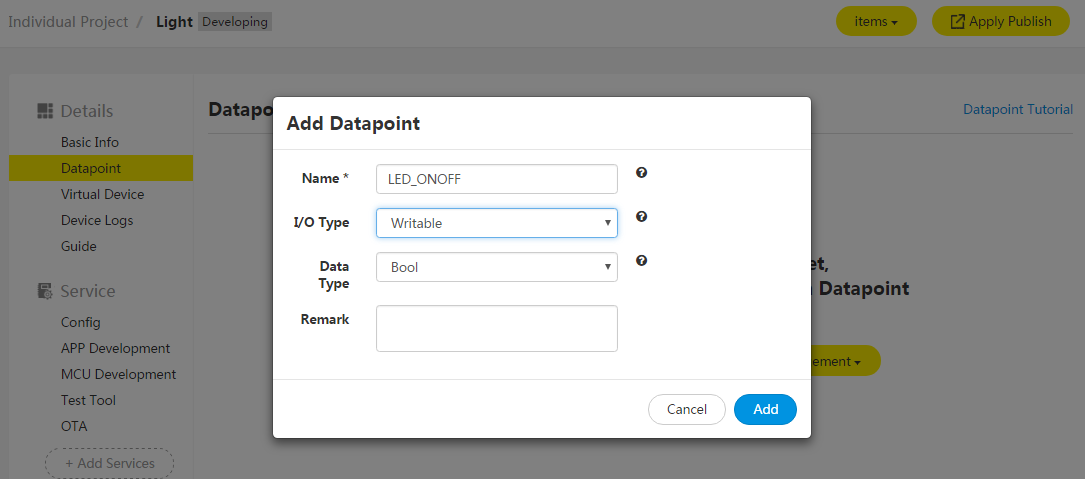
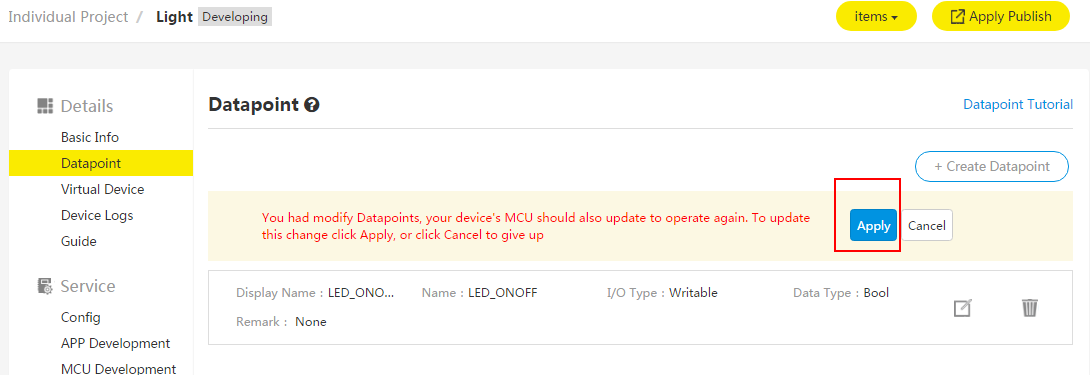
2. Create Data Points
Add corresponding Data Points for the product.
Click “Apply” after adding Data Points.
3. Generate code for the target platform
Note: Gizwits MCU Code Auto-Generator cannot be used if no Data Points have been previously defined.
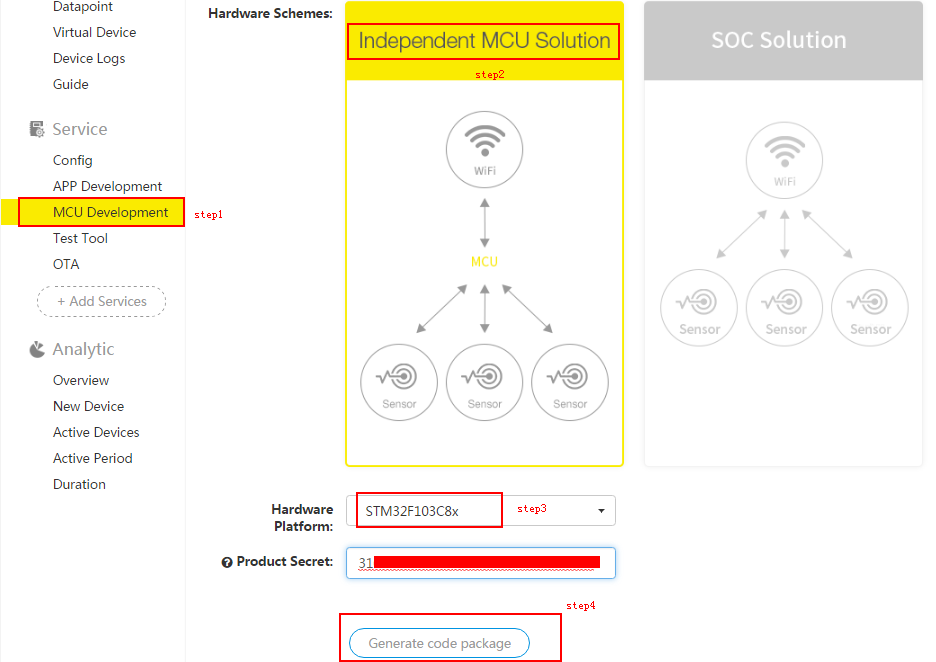
3.1 Generate code for the standalone MCU scheme
After defining Data Points, click “MCU Development” in the left navigation pane (Assume that the MCU used is STM32F103C8x) and choose the standalone MCU scheme for the hardware scheme. In the hardware platform drop-down list, select stm32f103c8x. Then click “Generate Code” and wait to download the generated code package.
Note: If the MCU used is another MCU chip, please select the “Other Platforms” option, and then port the generated code package to the platform used. For details, see Guide to porting Common Platform Edition of MCU SDK.
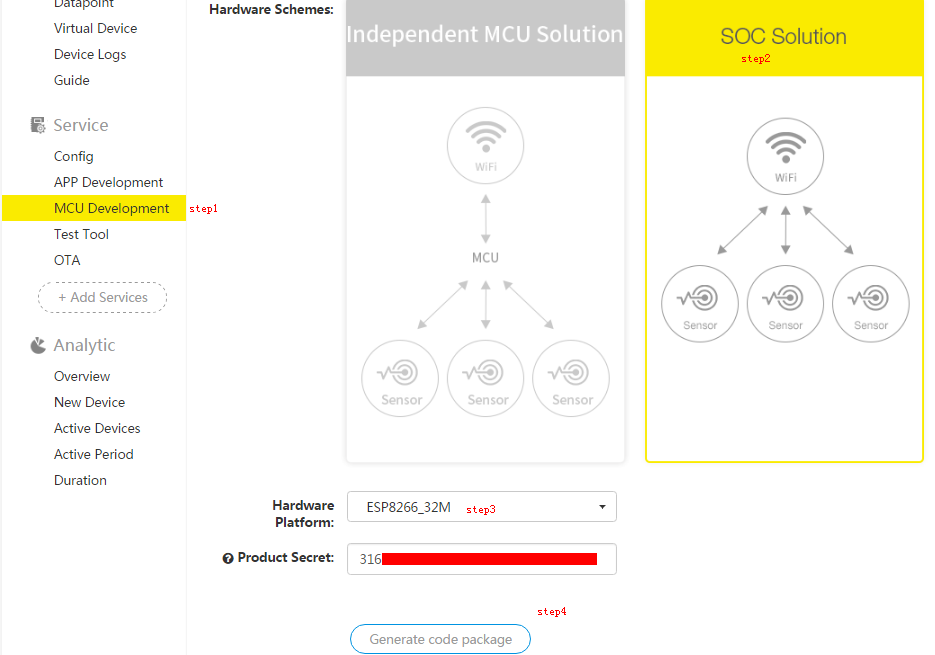
3.2 Generate code for the SoC scheme
After defining Data Points, click “MCU Development” in the left navigation pane (Assume that the SoC used is ESP8266) and choose the SoC scheme for the hardware scheme. In the hardware platform drop-down list, select esp8266. Then click “Generate Code” and wait to download the generated code package.
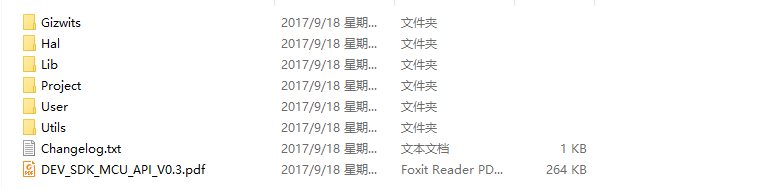
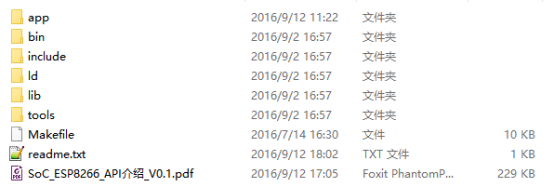
After downloading the code package, unpack it.
Explanation of the generated code
1. STM32 platform
The following table is the description of key code files.
File
Description
gizwits_product.c
This file contains product-related processing functions, like gizEventProcess(), and platform-related hardware initialization, such as serial ports, timers, etc.
gizwits_product.h
This file is the header file of gizwits_product.c, which stores product-related macro definitions such as HARDWARE_VERSION, SOFTWARE_VERSION.
gizwits_protocol.c
This file is for function definitions of the SDK API.
gizwits_protocol.h
This file is the header file of gizwits_protocol.c, which contains the function declarations of the SDK API.
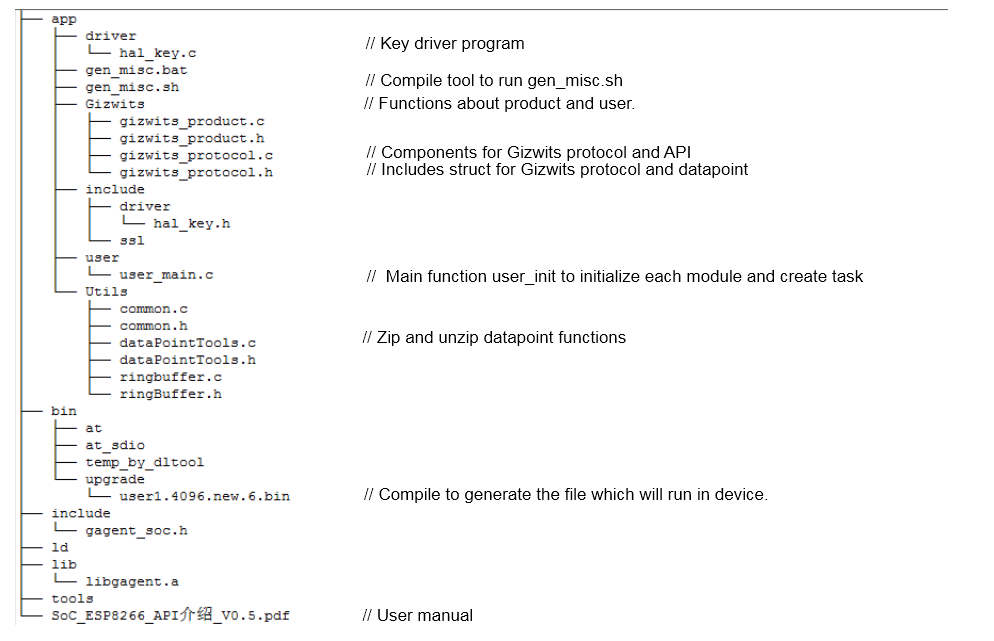
2. ESP8266 platform
The following table is the description of key code files.
File
Description
libgagent.a
The file is the device connection protocol library, which is located in the lib directory.
gagent_external.h
This file is the corresponding header file of libgagent.a, and the two files are used together.
gizwits_product.c
This file is for the platform-related processing, which contains the SDK API of event processing, i.e. gizwitsEventProcess().
gizwits_product.h
This file is the header file of gizwits_product.c, which contains product-related macro definitions such as HARDWARE_VERSION, SOFTWARE_VERSION.
gizwits_protocol.c
This file is for the protocol implementation, which contains functions of the SDK API.
gizwits_protocol.h
This file is the header file of gizwits_protocol.c, which contains protocol-related macro definitions and function declarations of the SDK API.
Secondary development
1. Know before you go
The Gizwits IoT Cloud generates the platform-specific (STM32, ESP8266 etc.) code packages according to the Serial communication protocol for Gizwits IoT Cloud access based on the user defined product Data Points. You only needs to call the corresponding APIs or add the corresponding event handlers.
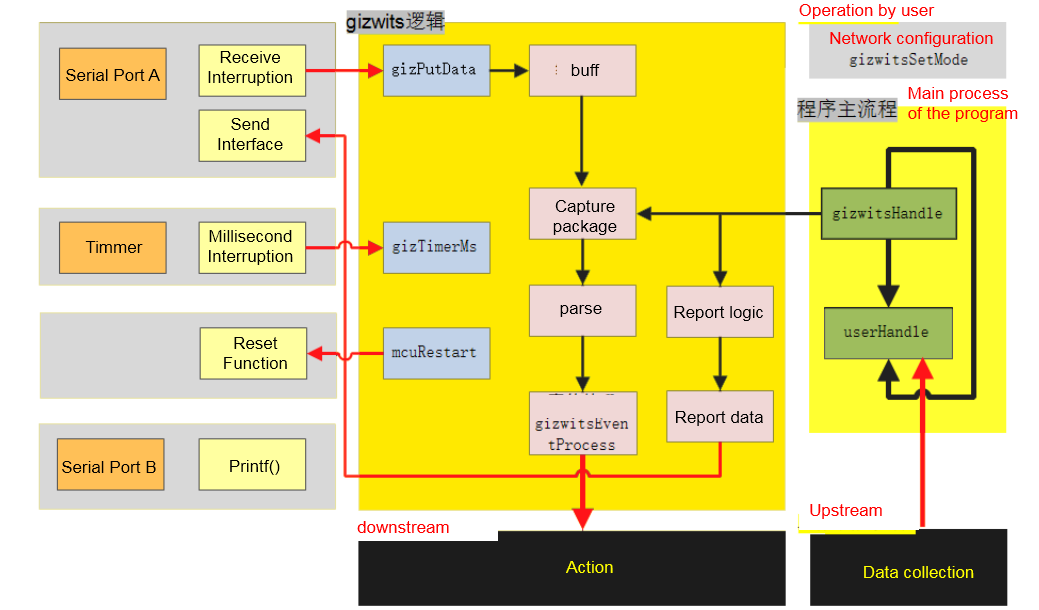
The code framework is shown below:
The functional blocks that need to be implemented are:
Downstream processing: For example, LED light switch, motor speed control, etc.
Upstream processing: For example, temperature and humidity data acquisition, infrared sensor status acquisition, etc.
Configuration processing: Configure network access and restore manufacture defaults.
2. Example
The automatically generated code adopts a uniform protocol across the platforms, so the modifications done by the secondary development are almost the same. The STM32 platform is taken as an example below.
2.1 Downstream processing
The first thing to do is sensor driver development, and then handle the corresponding event in the gizwitsEventProcess() function of gizwits_product.c under the Gizwits directory (in the following example of ledRgbControl(), which is used to control the RGB light color).
Let’s take the example of controlling the RGB LED. The code example is as follows:
The first thing to do is sensor driver development, and then the sensor data acquisition is implemented in the userHandle() function of gizwits_product.c under the Gizwits directory. You only needs to assign the collected value to the device state structure of the corresponding user area (in the following example: currentDataPoint.valueInfrared = irHandle();).
The following takes the data acquisition of the infrared sensor as an example (the operation of the read-only Data Point is automatically generated by the cloud):
Note: Since userHandle () is called in the while loop and its execution speed is fast, you can adjust the data collection cycle and the interface implementation location, to prevent unnecessary problems caused by the fast sensor data collection. However, it is not recommended to call the delay function in userHandle() to reduce the execution frequency. The correct method is as follows:
In addition to the upstream processing and downstream processing, some configuration operations need to be completed as follows:
Configure network access
Restore manufacture defaults
An API is provided to do the above operations, which is defined below.
1
int32_t gizwitsSetMode(uint8_t mode)
The parameter mode has three choices of WIFI_RESET_MODE, WIFI_SOFTAP_MODE, and WIFI_AIRLINK_MODE (see WIFI_MODE_TYPE_T in gizwits_protocol.h for details), which are for restoring manufacture defaults, entering the SoftAP mode, and entering the AirLink mode respectively. You can implement different configuration ways according to your product requirements, e.g., pressing on button triggers your device to enter configuration mode.
More
As of 2017, Gizwits MCU Code Auto-Generator features:
Supporting 8-bit, 16-bit, 32-bit MCUs
Seamless docking with CubeMX
Supporting four major types of MCUs: 51 MCU, MSP430, STM32, Arduino, including Alientek, etc.
Compatible with ESP8266 SoC scheme, including 8M, 16M, 32M modules